Improving Kubernetes Deployments with Tekton, Argo CD and Knative for Serverless Apps
· 13 min read
Introduction
Let's create a step-by-step plan to set up a CI/CD solution using free and widely used open-source tools that work smoothly on Kubernetes clusters.
Cloudtopiaa's Marketplace offers ready-to-use apps that you can set up with just a click on your Cloudtopiaa Kubernetes (CK) cluster. We'll use these 1-Click apps to quickly install each piece of software we need for our setup.
Learn to use Tekton to build a CI/CD pipeline that fetches code changes from a Git repository and builds a Docker image for your custom application. Then, Tekton will push the Docker image to a remote registry and notify Argo CD to deploy it to your Kubernetes cluster. This guide will also teach you how to use Knative Eventing to trigger the CI/CD pipeline each time code is automatically pushed to your application’s GitHub repository. All these steps run automatically.
In this guide, we'll use some helpful tools:
- Kaniko for building container images directly in a Kubernetes cluster.
- Tekton pipelines and Argo CD for implementing the CI process.
- Knative for running and exposing applications functionality on Kubernetes.
- Cert-Manager for managing TLS termination of Knative Services.
After completing this blueprint, you will have a fully functional CI/CD pipeline.
Once you finish following this guide, you'll have a special system in place that automatically builds and updates your apps whenever you make changes to their code, using Kubernetes.
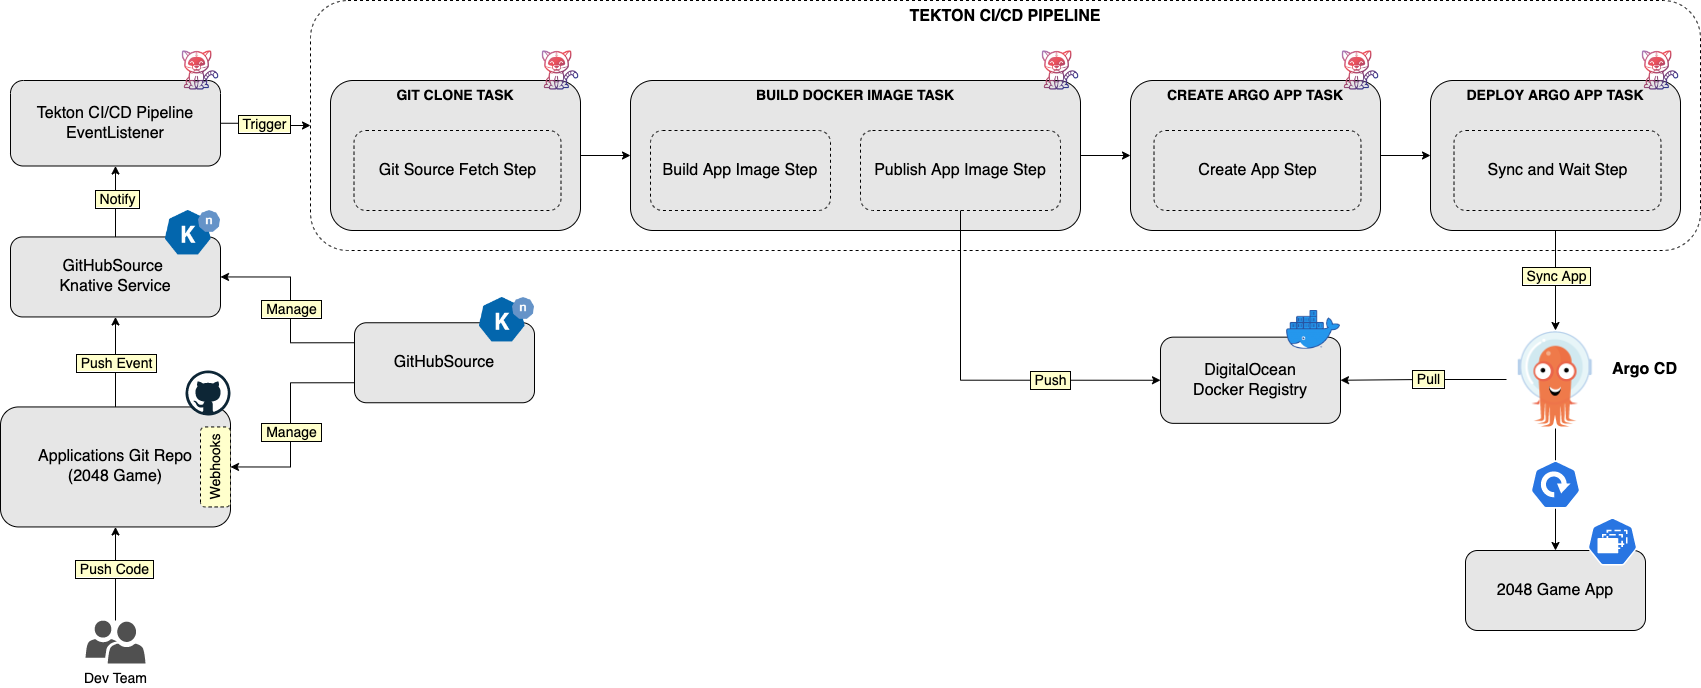
Look at this picture that shows everything we set up:

In the tutorial, you will learn:
- About components like Kaniko, Tekton, Argo CD and Knative.
- How to install each component using Cloudtopiaa 1-Click apps.
- How to configure the necessary components to respond to GitHub events and trigger the CI/CD pipeline.
- How to implement and test the CI/CD flow and deploy a sample Knative application (2048 game).
- A personal web address (a domain you own). This is important for making some parts of your project visible to everyone. If you're not sure about this, check out the Cloudtopiaa DNS Quickstart Guide for help.
- A special kind of computer system called CK, running Kubernetes (version 1.21 or newer). Your CK should be set up with at least 2 parts (we call them nodes), each with 2 CPUs, 4 GB of memory, and 20 GB of storage. For a step-by-step guide on how to set up CK, look at How to Set Up a Cloudtopiaa Managed Kubernetes Cluster.
- A tool to talk to your code's home on GitHub – it's called a git client.
- Another tool called doctl. It helps you talk to Cloudtopiaa's special computer system.
- Kubectl is like a magic wand that lets you talk to the Kubernetes world. Follow these steps to connect it to your CK.
- Helm is like a helper that makes things easier. You'll use it to talk to the special apps we set up on Cloudtopiaa
- Argo CLI and Tekton CLI help you manage your code and projects.
- Knative CLI is a tool for making your apps do amazing tricks in the Kubernetes world.
- Kustomize is a little helper tool too. Don't worry if you're not familiar with it – you can start with our tutorial to get the hang of it.
And that's it! With these tools, you'll be all set to dive into the tutorial on Cloudtopiaa.
Now, let's quickly meet each software component. This will help you understand what they do and how they work together.
Meet the Software Tools in Our Blueprint
Think of Kaniko as a special tool that helps create containers directly in your Kubernetes world. It's a super handy way to build and share these containers without leaving your Kubernetes club. What's cool is that you can set up a complete system for your apps right there in your Kubernetes space. It's like having a helper that does all the work for you!
Behind the scenes, Kaniko is like a smart worker that doesn't need any special tools to build containers. It does all the work without relying on a specific helper called Docker daemon. This makes it great for building containers in places that might not easily or safely support that helper, like a regular Kubernetes club. Kaniko itself is like a mini expert that you use as an assistant.
For more details about Kaniko, you can check out its official project page.
In this guide, you'll learn to use Kaniko to create packages for your custom apps right from your Kubernetes club. It's a fun way to make your apps look cool and work smoothly!
Meet Tekton: Your Code's New Friend
Continuous Integration or CI, helps teams collaborate on big projects smoothly. It uses a shared online folder for all the project's code. Whenever someone adds new code, a special tool checks to ensure it works well with the existing code. This happens automatically, keeping the project up-to-date and functioning properly. Continuous Integration is a helpful way for teams to work together without causing issues in the code.
In general, each CI automation follows a few simple steps:
Getting the Code:
- First, we take our application code from an online storage place.
Preparing it:
- Next, we use special tools to get our code ready.
Checking if it Works:
- Now, we test our code to make sure it does what it's supposed to, using methods like unit testing, integration testing, etc.
Creating the Final Version:
- Once everything is good, we finalize our code, often resulting in specific formats like a binary file, zip file, or Docker image.
Saving it for Later:
- Finally, we keep our final version safe for later use.
Tekton is a tool designed to help build systems that automatically test and deliver software. It works on top of Kubernetes, a system for managing large groups of software containers. With Tekton, developers can easily create these automated systems using small, reusable parts called Tasks. Tekton also comes with helpful tools like the Tekton CLI, which lets you control Tekton from your computer and a Catalog full of ready-to-use Tasks, making it easier to set up automated testing and delivery for your projects.
In this guide, Tekton manages the process of checking and building our code automatically. It uses a tool called a "Pipeline," along with others like "Tasks" and "Triggers." Think of Tekton as a helpful organizer that ensures our code is in good shape!
Tekton is set up in a neat and organized way. This tutorial uses different parts of Tekton to help with the checking and building of our code. It's like having a toolkit with specific tools for each job!
Tekton is like a set of organized tools. In this tutorial, we use specific Tekton parts to help with the part of software development where we check and build our code automatically. Think of it as using different tools to get a job done smoothly!
- asks: These are steps in a process, each with a specific job.
- Pipelines: Think of them as the overall structure, organizing steps in a sequence.
- Triggers and EventListeners: These respond to signals or events, like noticing changes and taking action.
Tasks
In Tekton, a Task is like giving your computer a to-do list. This list has smaller steps, similar to breaking down a big task into simple actions. Each step is a basic action, like building your code or saving it in a special place. You make a list of these steps in the order you want, and Tekton follows the list, doing each action one after the other. It's a way of telling your computer what to do in a clear and easy-to-follow way!
Tekton works by creating a special space in your computer called a Kubernetes Pod for each task. Inside these Pods, each step of the task is done inside a small container, sort of like a compartment in a toolbox. To know what to do, each container needs a special kind of blueprint called a Docker image. Which blueprint you choose depends on what you want each step to do.
- To run shell scripts, think of it like using a tool that's good at understanding and following instructions. It's called Alpine Linux.
- For building something called a Dockerfile, imagine using a special tool called Google's Kaniko. It helps in putting together everything needed for a certain job.
- If you want to control a tool named kubectl, you use a specific tool container called bitnami/kubectl. It's like using a special box that understands how to control this tool.
- If you have your own special instructions, you can use an image that understands your unique commands. It's like having your own custom toolbox for specific tasks.
Task definitions are made up of several parts, with the most important ones highlighted:
- Parameters: These are settings for a task, like how it should work or what names to use, such as compilation flags or the names of artifacts.
- Workspaces: Think of these as shared spaces where different parts of a task can store and use information.
- Results: These are like messages or important information that a task can send out. They can also be passed between different tasks in a sequence, helping them work together.
A usual Tekton Task definition might appear like this:
apiVersion: tekton.dev/v1beta1
kind: Task
metadata:
name: kaniko-example
spec:
params:
  - name: IMAGE
    description: Name (reference) of the image to build.
  - name: DOCKERFILE
    description: Path to the Dockerfile to build.
    default: ./Dockerfile
results:
  - name: IMAGE_DIGEST
    description: Digest of the image just built.
  - name: IMAGE_URL
    description: URL of the image just built.
steps:
  - name: build-and-push
    workingDir: $(workspaces.source.path)
    image: $(params.BUILDER_IMAGE)
...
- spec.params: This is where you list the things the task needs to work with.
- spec.results: Here, you list the important things the task creates. These can be passed to other tasks.
- spec.steps: This is where you list what the task should do step by step. Each step is like a small task within the bigger task, and they define how the task works.
Note: Task resources have been updated in Tekton, starting with version v1beta1 of the Tekton APIs. Instead of using Task resources directly, you are encouraged to use the new features as explained in the deprecation note.
In Tekton, just creating a Task doesn't make it run. To make a Task actually do something, you create a separate thing called TaskRun. Think of TaskRun as pressing the play button for your Task - it starts doing the steps you defined in your Task. TaskRuns do the work by following the steps you set in your Task. They can also take in specific instructions, like what resources to use or what information to consider.
Remember, tasks are like reusable tools you can share and use in different workflows. Tekton is special because it lets you build things with these reusable tools. And if you want even more tools, Tekton has a collection of them in the Tekton Catalog project to make your work even easier!
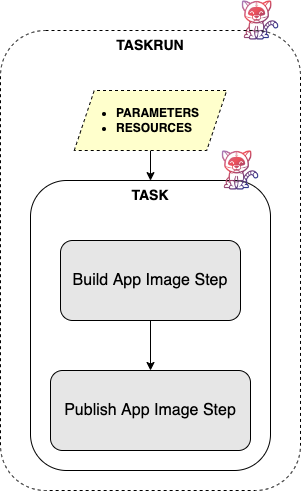
The image below shows how the concepts of Task and TaskRun work together:

Pipelines
A Tekton Pipeline helps you organize your tasks and control how your continuous integration (CI) process works. In a Pipeline, you specify the order in which your tasks should run. You can put tasks directly into a Pipeline, or you can use references to link to tasks defined in separate files. Using references is recommended because it helps avoid repeating the same code or settings, making things easier to manage. Tasks in Tekton are like tools that you can use and reuse across different pipelines. You can have separate pipelines for testing, building and deploying your app code, making it easier to manage each step of the process.
In a Tekton Pipeline, you set up the plan for your tasks using:
- Parameters: These are like global settings that apply to all the tasks in your pipeline.
- Workspaces: Think of these as shared spaces where tasks can store and share things.
- Tasks: These are the actual steps in your plan.
A regular Tekton Pipeline definition might look something like this:
apiVersion: tekton.dev/v1beta1
kind: Pipeline
metadata:
name: kaniko-pipeline
spec:
params:
  - name: git-url
  - name: git-revision
  - name: image-name
  - name: path-to-image-context
  - name: path-to-dockerfile
workspaces:
  - name: git-source
tasks:
  - name: fetch-from-git
    taskRef:
      name: git-clone
    params:
      - name: url
        value: $(params.git-url)
      - name: revision
        value: $(params.git-revision)
    workspaces:
      - name: output
        workspace: git-source
  - name: build-image
    taskRef:
      name: kaniko
    params:
      - name: IMAGE
        value: $(params.image-name)
      - name: CONTEXT
        value: $(params.path-to-image-context)
      - name: DOCKERFILE
        value: $(params.path-to-dockerfile)
    workspaces:
      - name: source
        workspace: git-source
Breaking down the provided configuration:
- spec.params: This section lists the input settings for the entire Pipeline.
- spec.workspaces: Here, you list spaces that different tasks can use to share information between them. It's like having a common table where everyone can put and find things.
- spec.tasks: This part outlines the steps to be done in order. These steps can be included directly in the Pipeline definition or referred to using a specific field. It's similar to listing the jobs you want to get done one after the other.
The Tekton Catalog (or Hub) is like a store that offers pre-made task definitions for common tasks, such as copying a git repository or building a Docker image with kaniko. You can add these tasks to your Kubernetes cluster using either the tkn CLI or kubectl. Then, you can use these tasks in your own custom pipelines by referring to them with a specific field. It's like having a set of ready-to-use tools that you can easily pick and use in your own projects.
When you make a Tekton Pipeline, it doesn't start running right away. To make it do something, you need to create something called a PipelineRun. Think of a PipelineRun like starting your Tekton Pipeline. It runs the tasks you set up in your Pipeline.The PipelineRun works by following the steps you defined in your Pipeline. It does each task in the order you specified, making sure everything runs smoothly. If all tasks are successful, great! If there's a problem, it stops and lets you know something went wrong.
Pipeline resources have been updated in Tekton, starting with version v1beta1 of the Tekton APIs. Because of this, they're not used in this tutorial or recommended anymore. Instead, users are encouraged to use the new features.When you reference tasks within a Pipeline, the corresponding TaskRun objects are automatically created for you. You don't need to create them separately, making things simpler and more efficient.
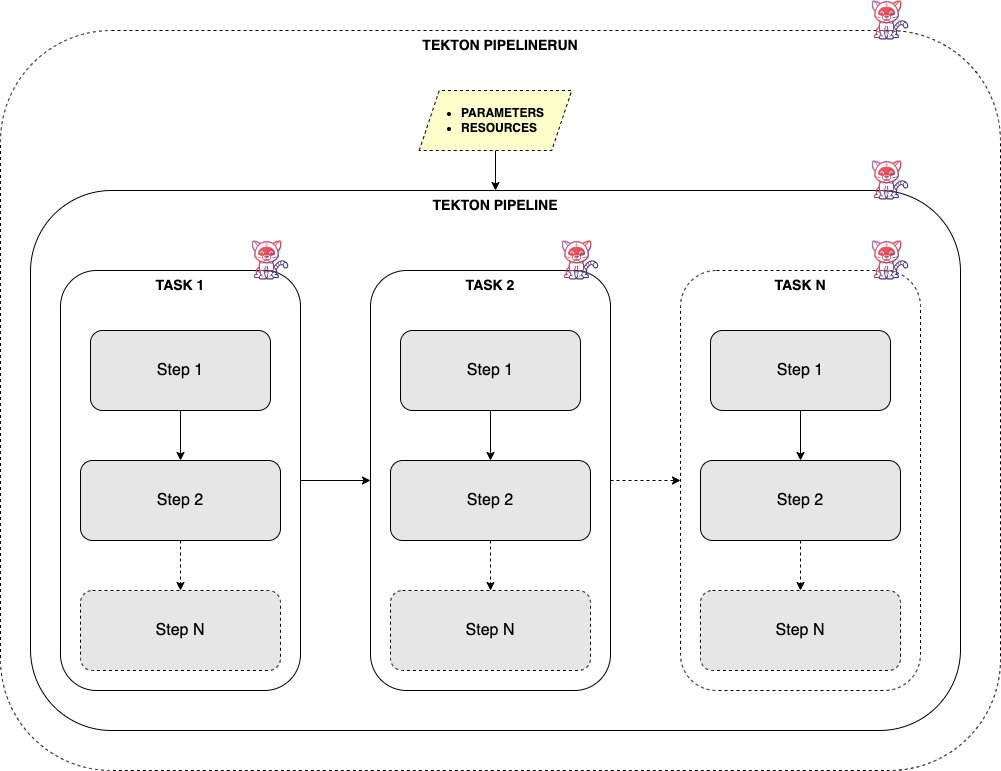
The image below shows how Pipelines and Tasks fit together:

Listening for Events and Triggering Actions
